Home | About Me | Recipe Index |
Showing posts with label baking. Show all posts

Tuesday, January 4, 2011

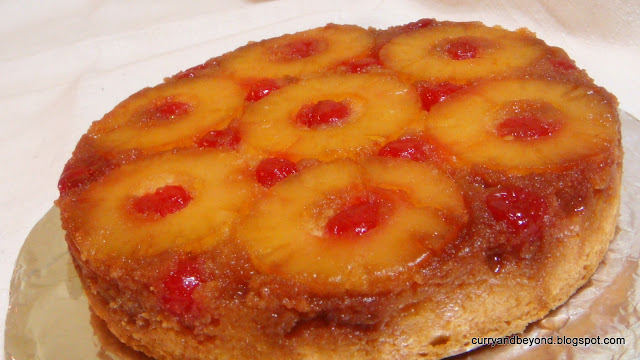
Divinely Decadent Pineapple Upside Down Cake


Wishing all my readers a wonderful and fun filled 2011. Wishes for new beginnings, new dreams , new possibilities, new hopes, new desires and new recipes for you all to try... I'm pretty excited about this new year as well..At the onset of new year I always feel like we are each presented with a clean slate to start all over again.. I can't wait to get started.

I thought hard about the 1st recipe/post of 2011..and this divinely decadent Pineapple upside down cake came to my mind and I just baked it last night..and here is the recipe for you all to try and share the joy with your dear ones. I'm sure you are ready for a sweet start.. (I'm always ready as I do have a sweet tooth...)
Ingredients :
For the topping
  • 1 can sliced pineapple
  • Maraschino cherries
  • 1/4 cup unsalted butter
  • 3/4 cup packed light brown sugar
For the cake batter

  • 1 1/2 cups all purpose flour
  • 2 tsp baking powder
  • 1 cup sugar
  • 1/2 cup unsalted butter
  • 2 eggs separated
  • 1 tsp vanilla extract
  • 1/2 cup milk
  • 1/4 tsp cream of tartar
Preparation :

Preheat oven to 350 degrees F.
Take a 9" X 2" round pan and melt 1/4 cup butter in it. ( I just place it in the oven for few minutes until the butter is melted). Now tilt the pan sideways so that the sides are well coated with butter as well. Sprinkle 3/4 cup light brown sugar over the melted butter. Now is the time to arrange the pineapple slices starting with the center and then place 6 slices around it. Then arrange the Maraschino cherries in the middle of each pineapple slice as well as the space between the slices. Its got a WOW effect when its baked and presented.


Now in the mixing bowl, beat the egg whites with 1/4 tsp cream of tartar until its light and fluffy and holds a firm peak using an electric mixer or hand mixer. Keep this aside in a different bowl. (As we'll need this mixing bowl to prepare our cake batter, in case of the electric mixer).
In a bowl , sieve together flour and baking powder and keep aside. Now in the bowl of the electric mixer cream butter and sugar until light. Beat Vanilla essence into it. Add the egg yolks one at a time and beat well after each addition. Add the flour mixture alternately with milk. Now gently fold in the beaten egg whites into the cake batter. Pour into the prepared cake pan and smoothen the top using a spatula.


Bake in the preheated oven for 45-55 minutes until the top of the cake is nice and brown as in the picture and the toothpick test comes out clean.
Let it cool for 10 minutes and then invert the pan onto a serving plate. Be Prepared to be wowed...Enjoy this delightful cake. It not only looks beautiful but tastes just heavenly as well.

Recipe adapted from Joy of Baking.

Sunday, January 17, 2010

Rich and Creamy Chocolate Cake


This is a pretty quick and easy recipe. For this particular cake, I have used one of my favorite frosting- Betty Crocker Rich and Creamy Chocolate Frosting. You could use any frosting of your choice.This post is even more precious to me as the pictures have been taken by my baking buddy- my 6 year old son. Since he always is so enthusiastic about his baking projects with his mom, I did let him take the clicks for this post and I'm very proud of him. I know I'm being boastful. When it comes to kids don't we all feel so proud to see our little ones..spread their wings and try to explore the world..and through their eyes and innocent hearts..this world is a such a beautiful place.

Ingredients :
  • 1 + 1/2 cup all-purpose flour
  • 2 tablespoons unsweetened cocoa powder
  • 2 teaspoons vanilla essence
  • 2 teaspoons baking powder
  • 1/4 teaspoon salt
  • 1/2 cup vegetable oil
  • 1/2 cup milk
  • 1 cup sugar
  • 2 eggs

Preparation :

  1. Preheat oven to 350 deg F (180 deg C). Grease a 9 inch round cake pan.
  2. In a large bowl mix flour, cocoa powder, baking powder, salt, sugar and vanilla essence
  3. Add milk, vegetable oil and eggs.
  4. Mix until all ingredients are blended , either by hand or by using an electric mixer at slow speed.
  5. Pour into the prepared cake pan. Bake in preheated oven for about 35 to 40 minutes, until a wooden pick inserted in center comes out clean.
  6. Allow the cake to cool. Then slice the cake through the middle to make two layers (easier if the cake has been in the fridge).
  7. Apply the frosting and your Rich and Creamy Chocolate cake is ready.
    ***Recipe adapted from here. Here you can also find the recipe for the Frosting (If you want to make it from scratch.)

Tuesday, January 12, 2010

Chocolate Chip Brownies - Whole Wheat Brownies and Award


This is my 50th post. I was thinking of a recipe which would be appropriate to celebrate this small milestone and decided to bake Brownies. They are a quick and easy dessert or snack. I tried to make it healthy (I know it does have lotz of sugar and butter - but I tried to make it a bit healthier) by adding Whole wheat flour and was pleasantly surprised by the results. Recipe is adapted from here .
Ingredients :
  • 1 cup whole wheat flour
  • 3/4 cup unsweetened cocoa powder
  • 3/4 cup butter
  • 1 1/2 cups sugar
  • 2 eggs
  • 1 tsp baking powder
    1/2 tsp salt
  • 1/4 cup buttermilk
  • 1/2 cup chocolate chips
Preparation :
  1. Preheat oven to 350F and grease a 9 inch square cake pan.
  2. In a large bowl mix together whole wheat Flour,baking powder,salt and sugar.
  3. In another bowl Blend melted butter and cocoa.
  4. Add butter/cocoa mixture to the large bowl with the dry ingredients. Add the eggs. Mix well.
  5. Add the Chocolate chips and buttermilk . Mix until all ingredients are blended.Pour into the prepared cake pan.
  6. Bake in preheated oven for 40 to 45 minutes, or until brownies begin to pull away from the sides of the pan. Let brownies cool, then cut into squares.


-----------------------And now its award time ------------------------

What perfect timing, My 50th post and an award. It make se so happy and its an humbling feeling that some of you out there read my recipes and love my blog. I am excited to receive this award from my blogpal , Faiza Ali of Faiza Ali's Kitchen who has passed this awesome 'beautiful blogger' award. Thank you so much for the generosity . She has a beautiful blog with a wonderful collection of recipes. Do check it out.


Now I would love to share this Beautiful Blogger award with all my wonderful blogpals who have motivated me with their feedback and kind words and helped me to go on. It would make me even more happy if each one of you could collect this award and display it on your beautiful blog as a thank you for being so supportive and help me celebrate my small little achievement.

Wednesday, December 23, 2009

Star Shortbread Cookies


Shortbread Cookies are traditional Christmas cookies. The simplicity of the recipe appeals to me. Few ingredients and easy to make. Also they are so soft they could just melt in your mouth. So that gives me a good reason to bake them around Christmas. But these cookies you could eat any time of the year, especially in our house. Since I make Heart Shortbread cookies for Valentine's day. I make Star Shortbread cookies for Christmas. But when it comes to these cookies you could just be limited by your imagination.

On this sweet note , Wishing Everyone Merry Christmas and Happy Holidays.

Ingredients :

  • 2 3/4 cups all-purpose flour
  • 1/4 cup cornstarch
  • 1/2 teaspoon baking powder
  • 1/4 teaspoon salt
  • 1 1/2 cups unsalted butter at room temperature
  • 3/4 cup powdered sugar
  • 2 teaspoons vanilla extract

** Adding cornstarch to this recipe makes these cookies more tender and melt in your mouth soft. Also I did take the liberty of checking out the reason why. Here it goes- Adding cornstarch lowers the gluten content of the dough and this makes these cookies a little more soft.

Preparation :

  1. PreHeat the Oven to 325 degress F.
  2. Line the baking sheets with Parchment paper.
  3. Sift the flour, cornstarch, baking powder and salt into a bowl and keep aside.
  4. Now in a large bowl, beat the butter, powdered sugar and Vanilla until creamy and smooth for a minute. ( I do it by hand but you could use an electric mixer on medium speed).
  5. Now slowly add the flour mixture to the butter-sugar mixture. Keep mixing till the flour mixture is well incorporated and it forms large clumps. Knead it into a dough.
  6. Flatten the dough into a disk shape. Depending upon the counter space you have t0 roll the dough, feel free to divide the dough into 2 or 4 disk shapes.
  7. Lightly flour the rolling surface and rolling pin. Roll the disk to a 1/4 inch thickness. Using a star shaped cookie cutter ,cut out the stars.
  8. Carefully transfer them to the prepared baking sheets and space them about 1 inch apart
  9. Bake them for about 18 - 20 minutes or until the cookies are lightly brown .
  10. Cool the cookies on the baking sheet for 5 minutes and then carefully transfer them to a wire rack to cool completely.
  11. This recipe makes about 30 shortbread cookies. You could store them at room temperature in a tightly covered container for up to 4 days. They could also be frozen and they are good for several months.

Tuesday, December 8, 2009

Apple Green Raisin Muffins


We (my six year old son and Moi) made these muffins last weekend. Perfect day to bake. It was snowing outside so had to be indoors. Just before Christmas we always get into the mood to bake. There's something about this time of the year which makes you crave for sweet goodness.
My son announced the secret Ingredients - Apple and Cinnamon. (You could tell he's been watching a lot of Food Network along with me, especially the Iron Chef where the contestants are given a secret ingredient which they have to use in all their dishes in a set amount of time.)

This is the first time I made Apple Cinnamon muffins. I used to make Banana Walnut muffins and since its been a while that I made them, I had misplaced the recipe. No worries I thought to myself and looked up this very promising recipe on the internet. You can find the original recipe here.
Now to cut a long story short I did make a lot of changes to the above recipe and my muffins did not quite rise as they are supposed to. But they still tasted great. Oh, well To ERR is Human and to Forgive Divine. But good lesson learnt when baking follow instructions to a tee, especially the flour to liquid ratio has to be perfect. (So I should have added less amount of milk ).Well now I know. Or maybe not. If you are reading this recipe, feel free to give your insights as to why my muffins did not rise enough to show off their muffin crowns.

Ingredients:
1) 1 1/2 cups all Purpose Flour
2) 3 teaspoons Baking powder
3) pinch of salt
4) 1/2 cup granulated sugar
5) 2 eggs lightly beaten
6) 1/2 cup or 1 Stick butter
7) 1 tablespoon Orange Zest
8) 1 cup milk
9) 1/4 cup Orange juice
10) 1 1/2 cups Gala apple peeled,cored and chopped
11) 1/4 cup green raisins
12) 1 tablespoon sugar
13) 1 teaspoon ground cinnamon


Preparation:

1) Preheat oven to 425 degrees.
2) Grease the muffin cups or line them with paper muffin liners.

3) In one bowl sift together flour, baking powder and salt. In another bowl cream butter and sugar. Add in the lightly beaten eggs. Whisk by hand. Add the Orange Zest, followed by milk and orange juice. Blend them together.

4) Now add the flour mixture to the butter mixture till its all moist and there are no lumps. Add the raisins and gently fold in the chopped apples.

5) Spoon the muffin mixture into the muffin cups already prepared.

6) Now to top the muffins , prepare a mixture of 1 tablespoon sugar and 1 teaspoon ground cinnamon.


7) Sprinkle the sugar-cinnamon mix on top of the pre-baked muffins.

8)Bake for 15 minutes or until a tooth pick inserted into the center of the muffin comes out clean.
9) Let it cool for couple minutes and then set them on a wire rack to cool completely.
10) Ready to serve. I love mine with ginger tea. This recipe yields 2 dozen Muffins(12 small and 12 mini muffins.)