Home | About Me | Recipe Index |

Thursday, December 31, 2009

Bunuelos - Mini Doughnuts

Bunuelos look like little miniature doughnuts and make excellent little munching snacks which could be served along with tea, coffee or hot chocolate . These are not that sweet but sweet enough. These resemble our old fashioned doughnuts. This recipe is from a book, " Mexican - healthy ways with a favorite cuisine" by Jane Milton. I had plans to make these for quite some time and with this holiday season I got a perfect opportunity to make these.

On this Sweet Note, Wishing Every one a happy, healthy and Prosperous New Year.

Ingredients :
  • 2 cups all-purpose flour
  • 1 teaspoon baking powder
  • pinch of salt
  • 1/2 cup sugar
  • 1 large egg
  • 1/2 cup milk
  • 1/4 cup butter
  • 1/2 teaspoon ground anise
  • oil for deep- frying
  • 2 teaspoons ground cinnamon
  • cinnamon sticks to decorate

Preparation :

  1. Sift the flour, salt, baking powder and ground anise into a mixing bowl. Add 2 tablespoons of the sugar. ( If you wish you could add 2 more tablespoons of sugar at this point).
  2. Place the egg and milk in a bowl and whisk it well. Melt the butter.
  3. Pour the egg and milk mixture gradually into the flour and stir constantly until well blended. Now add the melted butter. Mix well to make a soft dough.
  4. Knead this dough for about 10 minutes until smooth.
  5. Divide the dough into 10 pieces and roll into balls. Slightly flatten each ball with your hand. Then with a floured handle of a wooden spoon, make a hole in the center of the ball.
  6. Heat the oil for deep -frying. Heat the oil , until a cube of dried bread when added to the oil, floats and then turns golden brown in 30-60 seconds. Fry the Bunuelos until they are puffy and golden brown, turning them once or twice during cooking. As soon as they are golden brown, lift them out of the oil using a slotted spoon and lie them on paper towels to drain off excess oil.
  7. Mix the remaining sugar with the ground cinnamon in small bowl. Add the bunuelos, one at a time, while they are still warm, toss them in the mixture until they are lightly coated and serve immediatley . Decorate with cinnamon sticks.

Wednesday, December 30, 2009

Strawberry Orange and Pineapple Smoothie


What do Strawberries, Pineapple and Orange have in common. ?...
Well, they all taste great. What were you thinking. I know, you were thinking of the obvious..they are all loaded with vitamins(anti-oxidants) and minerals and fiber. That means they are really good for you too. So its a win-win situation. Also they are super easy to make and if you are pressed for time and need to snack on something real quick Smoothies is the way to go, atleast in my house.
I was reading a very interesting article. It marked December 29 as the day when people feel most guilty about giving into their indulgences over the last 12 months. Many felt that the day in the middle of the festive season i.e. four days after Christmas and three days before New Year was the ‘guiltiest’ time of the year. Read the entire article here.

So this gave me the idea for this guilt free indulgence(smoothie).

Ingredients:
  • 1 cup diced Strawberries
  • 1 Navel Orange peeled and diced
  • 1 cup diced Pineapple
  • 1 cup ice
  • 1 tablespoon honey
*If you are using frozen Strawberries, then substitute ice for 1 cup of water or else smoothie will be too thick.

Preparation :

  1. Combine all the ingredients in a blender.
  2. Blend until smooth.
  3. Serve immediately. This recipe makes 2 to 3 servings.

Monday, December 28, 2009

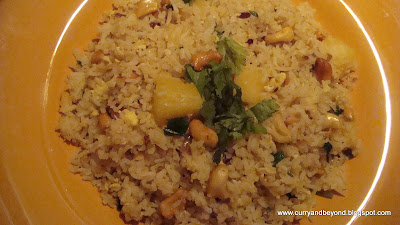
Pineapple Stir-fried Rice

After all the festivities and indulging in all the holiday cookies and sugary delights, we all look for healthier recipes and try to include more fruits and vegetables. This is that kind of recipe which will make you feel good about making it for yourself and your loved ones. Its a Thai Recipe. This rice dish goes really well with the Garlic shrimp recipe I posted earlier. It could also go well with Stir-fried vegetables. Its quick and easy to make. There are lot of variations in making this Fried Rice. You could even add chopped Chinese sausage, cooked chicken or cooked shrimp to it. I have just used Pineapple and eggs for this recipe.

Ingredients:
  • 4 cups cooked rice
  • 2 cups diced pineapple
  • 2 eggs beaten
  • 1 cup red onion/5 shallots thinly sliced
  • 5 cloves garlic, thinly sliced
  • 1/4 cup chopped roasted cashews
  • 3 tbsp fish sauce
  • 2 tbsp soy sauce
  • 2 green onions,thinly sliced
  • 3 tbsp chopped fresh cilantro
  • 2 small fresh red chillies, seeded and thinly sliced
  • 2 tbsp oil
  • salt to taste (optional)

*** Fish sauce is recommended for this recipe, I have not used it though as we still have'nt acquired the taste for it yet , so its upto your discretion you could use it or leave it. Also salt is added when rice is cooked , thats the reason its optional.


Preparation :
1) Heat oil in a wok or a skillet and keep it on medium-high heat. Add onion and garlic and stir-fry for 30 seconds, or until light golden.
2) Add eggs and stir fry for 30 seconds.
3) Add rice, pineapple and soy sauce and cook for 3 to 4 minutes, or until rice has separated and all the ingredients are mixed well.
4) Garnish with green onions, cilantro, cashews and sliced chilles.

Wednesday, December 23, 2009

Star Shortbread Cookies


Shortbread Cookies are traditional Christmas cookies. The simplicity of the recipe appeals to me. Few ingredients and easy to make. Also they are so soft they could just melt in your mouth. So that gives me a good reason to bake them around Christmas. But these cookies you could eat any time of the year, especially in our house. Since I make Heart Shortbread cookies for Valentine's day. I make Star Shortbread cookies for Christmas. But when it comes to these cookies you could just be limited by your imagination.

On this sweet note , Wishing Everyone Merry Christmas and Happy Holidays.

Ingredients :

  • 2 3/4 cups all-purpose flour
  • 1/4 cup cornstarch
  • 1/2 teaspoon baking powder
  • 1/4 teaspoon salt
  • 1 1/2 cups unsalted butter at room temperature
  • 3/4 cup powdered sugar
  • 2 teaspoons vanilla extract

** Adding cornstarch to this recipe makes these cookies more tender and melt in your mouth soft. Also I did take the liberty of checking out the reason why. Here it goes- Adding cornstarch lowers the gluten content of the dough and this makes these cookies a little more soft.

Preparation :

  1. PreHeat the Oven to 325 degress F.
  2. Line the baking sheets with Parchment paper.
  3. Sift the flour, cornstarch, baking powder and salt into a bowl and keep aside.
  4. Now in a large bowl, beat the butter, powdered sugar and Vanilla until creamy and smooth for a minute. ( I do it by hand but you could use an electric mixer on medium speed).
  5. Now slowly add the flour mixture to the butter-sugar mixture. Keep mixing till the flour mixture is well incorporated and it forms large clumps. Knead it into a dough.
  6. Flatten the dough into a disk shape. Depending upon the counter space you have t0 roll the dough, feel free to divide the dough into 2 or 4 disk shapes.
  7. Lightly flour the rolling surface and rolling pin. Roll the disk to a 1/4 inch thickness. Using a star shaped cookie cutter ,cut out the stars.
  8. Carefully transfer them to the prepared baking sheets and space them about 1 inch apart
  9. Bake them for about 18 - 20 minutes or until the cookies are lightly brown .
  10. Cool the cookies on the baking sheet for 5 minutes and then carefully transfer them to a wire rack to cool completely.
  11. This recipe makes about 30 shortbread cookies. You could store them at room temperature in a tightly covered container for up to 4 days. They could also be frozen and they are good for several months.

Classic Chocolate Chip cookies


These cookies never get old. We are having a Winter Celebration in my son's school today. He had offered to take some home made cookies. According to him since I have a food blog now.. I can cook or bake anything. It does'nt take much to impress little kids. After giving him many choices he came up with " How about Chocolate Chip Cookies".. So Chocolate Chip Cookies It is ..

Ingredients :
  • 2 1/4 cups all purpose flour
  • 1 teaspoon baking soda
  • 1/2 teaspoon salt
  • 2 cups Hershey's Milk Chocolate chips
  • 1 cup(2 sticks) butter , softened
  • 3/4 cup granulated sugar
  • 3/4 cup packed light brown sugar
  • 1 teaspoon vanilla extract
  • 2 eggs
Preparation :
  1. Heat oven to 375 degrees F.
  2. Beat butter, granulated sugar, brown Sugar and Vanilla in a large bowl until creamy. Add eggs, beat well. Sift together flour, baking soda and salt, add this gradually to the butter mixture, beating until well blended. Stir in chocolate chips.
  3. Drop by teaspoons onto ungreased cookie sheet. Bake 8 to 10 minutes or until lightly browned.
  4. Cool slightly. Remove from the cookies sheet to the wire rack and allow to cool completely.
    *** This Recipe is on the back cover of the Hershey's Milk Chocolate Chips (1 lb) package.

Tuesday, December 22, 2009

Morning Glory Muffins and Awards


These are great breakfast muffins. If you have no time for Breakfast, just grab a couple of these carrot,fruit and nut muffins and take breakfast with you. How easy can it get. No more excuses for not eating your breakfast. In fact I belong to this category of "no time for breakfast" myself. But when I bake some tea cakes or muffins I surely have time for breakfast. Also they are so nutritious you don't feel guilty eating them or making them for your kids. Also you could store them in a tightly covered container at room temperature for up to 4 days.

Also I'm really curious to know why they are called Morning Glory. The only logical explanation I could think is that they are good for breakfast so morning glory. Feel free to enlighten me with any information about the origin of this name. This recipe is from a book," Big Fat Cookies" by Elinor Klivans. Since I'm really partial towards muffins. I used this recipe to make muffins

Ingredients:
  • 2 3/4 cups all-purpose flour
  • 1 teaspoon baking powder
  • 1/4 teaspoon salt
  • 1 teaspoon ground cinnamon
  • 3/4 cup ( 1 1/2 sticks) Unsalted butter
  • 1 3/4 cup granulated sugar
  • 1 teaspoon finely grated orange zest
  • 2 large eggs
  • 2 teaspoons vanilla extract
  • 1 cup finely grated peeled carrots
  • 3/4 cup grated peeled apple
  • 1 cup raisins
  • 1/2 cup shredded sweetened coconut
  • 1 cup coarsely chopped walnuts

***Please do not be intimidated by the long list of ingredients. The list looks long but most of the ingredients are likely to be in your pantry.


Preparation :

1. Preheat the oven to 350 degrees F.
2. Grease the muffin cups or line them with paper muffin liners.
3. Sift the flour, baking powder, salt and cinnamon into a medium bowl and set aside.
4. In a large bowl beat the butter, sugar and orange zest for about a minute until smoothly blended .
5. Add the eggs and vanilla and mix for about a minute until blended .
6. Mix in the carrots, apple, raisins,coconut and walnuts.
7. Now slowly add the flour mixture, mixing just until incorporated.
8. Now Spoon the muffin mixture into the muffin cups already prepared.

9. Bake for about 20 minutes or until the toothpick inserted into the center of the muffin comes out clean.
10. Let them cool for about 5 minutes and then set them on a wire rack to cool completely.
11. Ready to be served. This recipe yieds two dozen medium size muffins.


Now its Award Time ....
I'm a bit late in posting my awards. I was a little under the weather. But now feel great especially after seeing these awards. Who would'nt be..right. Did not want to look like I was'nt happy. I'm very happy to say the least.

Let me share my happiness and awards with you. Asha Latha has been kind enough to give me this award and Malar Gandhi has been generous enough to share this award with me as well. Both these fellow blogger friends are remarkable in what they do. Do check out their blogs and you will know what I mean. Thank you Asha and Malar. This is a great feeling. I hope to pass on the happiness to all my followers of my blog. Even if you are not a follower but took the efforts to browse through my blog, you can take the award too for your efforts. Feel free to pick up this award and display it on your blog. Lets spread the happiness.

Also there's another award from Priya. She has just posted her 150th post. It was a thankyou award from her as well as a Christmas Card. Heartiest Congratulations on your achievement.


Feel free to pick up these awards as well and display it on your blog. Happy Holidays.

Thursday, December 17, 2009

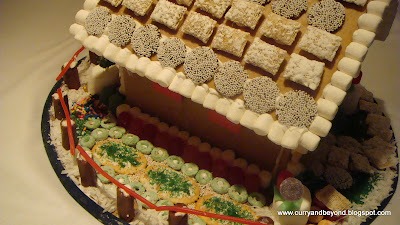
GingerBread House

The Joy is in the journey and in this case the destination too... Wishing Everyone Merry Christmas and Happy holidays.

Mission accomplished. I always wanted to make a Gingerbread House and finally we made it. My first ever Gingerbread House made from scratch. Not that there's anything wrong with the pre-assembled ones. I had waited so long to make one I wanted to experience the joy of making one right from scratch. Also I had promised my son we'll make one soon. Now since it was so close to Christmas I started frantically searching for the recipes and the know-how before we set out in our venture. Finally zeroed in on a good recipe. Got all the ingredients and then waited for a good day to start with our "Gingerbread House project". Ok let me admit to you that I almost chickened out but since we had made plans and the ingredients were all set up right on my kitchen counter , it was hard to ignore this Project any longer.

So this is how our Mission was Accomplished. We did not do it all in one day. It always helps if we break it up in smaller sessions. We took 1 and half days - just like half an hr to an hour sessions. Only the decorating took more time.

  • First I Cut out the template/pattern for the house.
  • Prepared the dough for the Gingerbread house.
  • Baked all the pieces of the house (4 pieces for the walls and 2 for the roof).
  • Made the Royal Icing .
  • Put the house pieces together using Royal Icing.
  • Decorated our GingerBread House.

This is where I got my recipe for this structural strong Gingerbread house. Also since we still have a few days before X'mas and I have tested this recipe. IT works. I would recommend this to everyone out there who wants to make a gingerbread house. Also a great project for the holidays where you can involve your kids.

To Make Gingerbread House Dough.
Ingredients
  • 2 cups light corn syrup (or dark corn syrup for a darker house)
  • 1 1/2 cups firmly packed dark brown sugar
  • 1 1/4 cups or butter
  • 9 cups all-purpose flour
  • 1/2 teaspoon salt

**Using the above ingredients I made one house and have some dough left over (little less than half) which I'll use to make Christmas ornaments. So if you are using the above recipe you can make the adjustments as needed. For me this is my 1st time so just wanted to try as is ..without any major changes.


Preparation :

1) In a bowl add the butter, corn syrup and brown sugar and microwave until the butter melts.


2. Stir well until the brown sugar dissolves.

3. Add this mixture to the flour and knead into a dough.


4. If you are not using the dough right away , Keep it covered in a plastic wrap and refrigerate.


5. Now if the dough is refrigerated and its too hard to roll just microwave for 10-20 seconds. Now roll the dough to 1/4 " thick with a rolling pin on an aluminium foil/Parchment paper so that we could cut out the pattern for our Gingerbread House. We would need parchment paper to roll out the dough . Also aluminium foil works well (since I did not have parchment paper). Also this helps us to transfer the pattern onto the baking sheet. If you try to get them off and then transfer the pattern could be pulled and will not be of the right measurements. Place the template/pattern onto the rolled dough.


6. Cut using a pizza cutter or kinife.


7. Repeat this until you get all the pieces for the house. 2 gabble walls, 2 regular walls and 2 roofs.


8. Bake on a pre-heated oven at 350 degrees F. Bake for about 12-15 minutes. I baked mine for almost 14 minutes.


9. Let them cool and then transfer them carefully to a wire rack to cool completely. In fact I let them cool for about 3 hours before I assembled them.
10. Now before we begin assembling the Gingerbread House its a good idea to keep all the walls of the house and the decorations handy. Because once we make the Royal Icing its always good to begin gluing them together as soon as possible as Super Icing dries very quicky.
11. Making Royal Icing.
  • 3 3/4 cups sifted confectioners' sugar
  • 3 large egg whites
  • 1/2 teaspoon cream of tartar
* I have used 1 teaspoon of lemon juice as a substitute for cream of tartar.
Combine all the ingredients in a bowl and turn mixer on high and beat till its thick and white. It should take around 7 -10 minutes. You could also whisk it by hand for about 7-8 minutes. Thats what I did and you will notice its getting harder to whisk as it gets thicker. Our Royal Icing is Ready.

*** Always cover your Royal Icing with plastic wrap, making sure it touches the royal icing so a crust doesn't form since it dries out quickly. Also if the icing gets too thick you could add little water and if its too thin add more confectioners' sugar.


12. I did get a 15" cardboard circle to built my gingerbread house on (foundation). Now fill up a pastry bag with the icing and begin assembling the Gingerbread house.You could check out the step by step assembling tips here. Its recommended to use a #10 plain round tip for bold lines and #3 plain round tip for thin lines. Begin by making a L shape with the icing. I made thick and bold lines so that the walls could have enough glue to stick together and be strong. Now add two adjacent walls. Hold on to them for about 30 seconds to a minute and then continue with the other two walls. On the inner side of the wall apply some icing to all the four seams. Now go onto to the roof. Apply a thik bead of icing on all the top edges of the wall and attach one roof at a time. Then apply icing onto the seam where the two roofs meet.


13. The decoration begins. This is the best part. This is the time to unleash your inner child and just have fun...Enjoy.


Monday, December 14, 2009

Irish Potato Soup


This is an easy soup to make with all ingredients available in your pantry. Now I would presume that Potato is an universally loved vegetable. Every cuisine has some use for this wonderful vegetable. Did you know that Potatoes are the world's fourth largest food crop, following rice, wheat and maize. Well how do you think I know, just read it at our valuable and reliable source which is Wikipedia. Read More about potatoes here.

Also the Irish Potato Soup has a lot of variations. Some use celery and leeks in the soup as well.

Ingredients:
  • 4-5 medium size potatoes peeled and cubed
  • 1 cup red onion chopped
  • 2-3 cloves of garlic chopped
  • small piece of ginger
  • 1-2 green chillies chopped (optional)
  • 2 bay leaves
  • 2 tablespoons butter
  • 1 cup milk
  • freshly crushed black pepper
  • salt to taste
  • 5-6 cups vegetable stock or water

Preparation:

  • Heat butter in a thick bottomed pan. Add the Bay leaves. Then Saute the onions ,garlic and ginger till about golden brown.

  • Add the green chillies and diced potatoes. Fry for about 2 minutes.
  • Add the vegetable stock/water . Season with salt and pepper and cook covered for about 25 -30 minutes until the potatoes are tender.
  • Now carefully remove the bay leaves and puree the rest in a Blender.
  • Transfer it back to the pan and add milk and stir it well. Let it simmer for about 2-3 minutes.
  • Adjust the seasoning. Ready to serve. This recipe serves 4.

Sunday, December 13, 2009

Vegetable Hakka Noodles


Vegetable Hakka Noodles is simply loved by everyone. I would call it an Indo-Chinese dish. Hakka noodles are flat noodles and they are quick cooking noodles. Since I'm a big fan of Quick, Easy and Healthy Meals its no secret why this recipe finds itself here.

Ingredients:
  • 1 packet Hakka Noodles (Ching's Secret)

  • 1 cup cabbage shredded

  • 1 cup carrot cut into julienne

  • 1 cup green bell pepper sliced

  • 1 bunch of spring onions chopped

  • 1/4 cup ginger sliced

  • 1/4 cup red onion sliced

  • 2 tablespoon oil

Preparation :
  • Prepare by chopping all the vegetables as shown.

*I buy carrots cut into thin strips like matchsticks...thats what you see in the picture. It's a real time saver.

  • Now cook the noodles as per the package instructions. In case of Ching's Secret Hakka noodles. Boil 10 cups of water in a large pan. When the water comes to a boil, cook the noodles for ONLY 2 minutes. The noodles are cooked Al dente. Now drain the noodles and spread them on a flat surface. Add 1 teaspoon of oil onto the noodles to prevent them from sticking.


  • Prepare the sauces : In one bowl take 1 teaspoon soy sauce,1 teaspoon green chilli sauce, 1 teaspoon chilli vinegar and 1 teaspoon red chilli sauce. The other bowl is 2 tablespoons of Schezwan sauce. This is optional. (I like to add this sauce as well to my vegetable hakka noodles though tradionally its added to Vegetable Schezwan noodles).

**You could adjust the seasonings to your taste if you think this is too hot for you . I use Ching's Secret Sauces.**


  • Now heat oil in a wok or frying pan on a high flame. Add all the vegetables except the spring onions and stir-fry for about a minute. Add both the sauces and stir fry until vegetables are crunchy and half cooked. Now add the noodles and stir fry on high flame for 2-3 minutes.
  • Ready to serve. Garnish with the chopped green onions.

Friday, December 11, 2009

Rava Dosa - Semolina Crepes


Rava Dosas are Instant. No Grinding, no pre-soaking required. I always enjoyed the Rava Dosa in the restaurants but never tried them at home. I knew you needed some practice in making Rava Dosa. So Today I mustered enough courage to try my hand at making Rava Dosa. Also I was getting ready to participate in Malar Gandhi's event "Mishaps in the kitchen". So I knew If this venture did not go well I could always send this post to her event.
The first couple Dosas were not really picture worthy. I had to scrape them off the Tava(Griddle). They tasted like Rava Dosa but did not quite look like the picture I envisioned. Also by now the kids knew there was going to be dosa for dinner. So I better start getting my act straight or cook something up real quick. Thank God it was Friday night, so no dead line for bedtime. I put the flame on slow. Then by the fourth try it did turn out a little better. I was happy and so were the kids as by now they were really hungry. Now you be the judge and tell me how they turned out.

Ingredients :
1) 1/2 cup Rava /Semolina /Sooji
2) 1/2 cup Rice flour
3) 1/4 cup Maida or All purpose flour
4) 1/2 teaspoon cumin seeds
5) 2 green chillies finely chopped
6) 1 teaspoon finely chopped ginger
7) pinch of hing or asofoetida
8) salt to taste
9) 3 1/2 - 4 cups water
10) oil for roasting the dosa
* You could substitute water for butter milk. This recipe is a bit forgiving as to the amount of water or butter milk you could add, since the batter is not as thick . You could compare the consistency to that of butter milk.

Preparation:
1) Mix together Rava, Maida and Rice flour . Add the water and make a batter making sure that no lumps are formed.
2)Now add the salt, hing(asofoetida), cumin seeds, chopped green chillies and chopped ginger.
3) Keep this aside for 30 minutes.
4) Heat a Dosa Tava or Griddle.
5) Mix the batter well and pour a laddle full of batter start from the outside to the inside in a circular manner. The preparation of this dosa is quite different than our regular Dosa. The way its done is you first make the outer circle of the dosa and then fill the centre with the batter. While making the Dosa keep it medium to low flame.
6) Add oil around the dosa and some oil on top of the dosa. I do make it on a high flame now for the dark golden and crispy look.
7) Once golden brown turn over and fry for another minute or so.
8) Serve hot with coconut chutney and sambhar.