Home | About Me | Recipe Index |

Saturday, December 17, 2011

Rava Ladoo - Sooji(Semolina) Ke Ladoo

Sooji ke Ladoo / Rava Ladoo
The countdown to Christmas begins. Our Christmas tree is all set up and the kids are again eagerly waiting for their dear Santa. Each day my younger one who is four keeps looking at the calendar and keeps track of the date.

This year for Christmas I decided to make some traditional Indian sweets which are prepared during Diwali as well as for Christmas. If you were to ask a foodie like me I just may need an excuse to make these, be it Christmas or Diwali.  

These are quick and easy to make with just five ingredients and taste awesome. These also make as an excellent gift for Christmas.

Ingredients :
  • 1 cup Rava/Sooji /Semolina
  • 1 cup sugar
  • 1/4 cup unsalted butter / ghee
  • 1/4 cup raisins *
  • 1/4 cup cashews *
* Fry raisins and cashews in about 1 tbsp ghee/unsalted butter 

Preparation : Heat a thick bottomed pan / Kadhai. On medium  flame dry roast the Rava/sooji  for about 5-7 minutes. Keep stirring continuously so that the Rava does not get burnt. Take it off the heat and let it cool. Now in a grinder, grind the roasted rava and sugar into a really fine powdered consistency. To this add the fried cashews and raisins. Warm the ghee/unsalted butter and add to the mix. Start making the ladoos immediately.Take a little of the mixture into your hands and form them into small balls. This recipe makes 12 -14 ladoos.

Just in case... 
The ladoo mix gets too dry add a little ghee/butter and continue making the ladoos. Some people do add a little warm milk to the mix . This I do agree makes it much easier to make the ladoos, but the shelf life is not much - just about 3-4 days.

Happy Holidays. Enjoy !!!

 
Sooji ke Ladoo / Rava Ladoo

Sunday, November 13, 2011

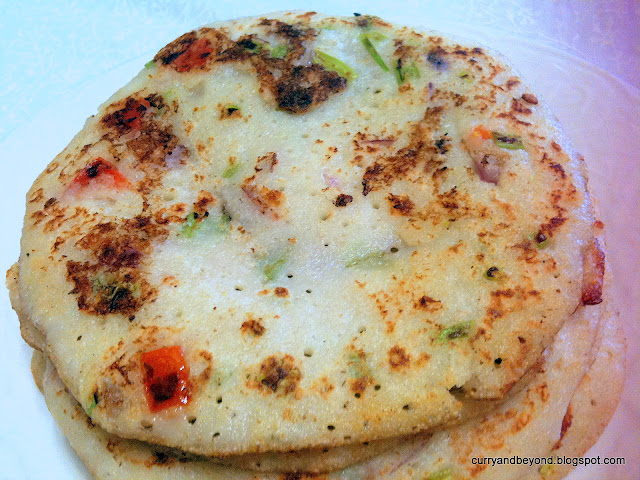
Instant Uttapam - Savory Onion and Tomato Pancakes

Onion & Tomato Uttapam / Savory Pancake
Uttapam are savory pancakes. At my house my kids can eat this for  breakfast, lunch or dinner. I love the versatility it offers. You could incorporate a lot of veggies. It could be enjoyed with good old ketchup, green Cilantro Chutney , Mulagai podi(chutney powder) or Sambhar. Most of the time I  make it right from scratch. I presoak the rice and Urad dal(white lentil) separately and then grind them. Mix it well , add some salt and leave it for fermentation. This fermented batter is then used to make Idlis, Dosa and Uttapam.

Since I did not have any batter to make this , I googled for an instant recipe and came across the LOVE4COOKING  blog and followed the Instant Onion Uttapam recipe.

 Its a very easy recipe and the Uttapams/Pancakes came out great. My kids loved them and did not have much left to take some decent clicks. Now I would call it an almost instant recipe as we still have to keep the mixture aside for half an hour. But that half an hour goes quick..believe me. Also that time could be utilized for chopping the veggies (onion,tomato, green cilanto leaves, green chillies). If you still have some time left you could enjoy a cup of tea and watch your favorite show.
 
Ingredients :
 Instant Uttapam Mix
  • 1 1/2 cup Semolina /Sooji/Rava
  • 1/2 cup rice flour
  • 1 cup yoghurt
  • 1 cup water
  • salt to taste
 Preparation : Take 1 cup of yoghurt and mix about 1 cup water. Whisk it well. Make it like buttermilk consistency. Now to this add semolina and rice flour. Mix it well. Cover and keep it aside for half an hour for fermenting. Now chop the veggies (1 red onion, 1 tomato, 2-3 green chillies and a handful cilantro leaves).  After its been resting for 1/2 hour, the Uttapam mixture will be a bit dense as the semolina absorbs most of the water. Add about 1/2 cup to 1 cup water , mix it well. Add salt and the chopped veggies. Heat a griddle/Tawa.  When its hot, pour about 1/4 cup batter onto the griddle and spread in a circular motion. Apply some oil around the Uttapam. Once its cooked turn it and let it cook on the other side.   

Onion & Tomato Uttapam / Savory Pancake

Enjoy your Uttapam/Savory Pancakes with Sambhar, chutney or ketchup. This recipe yields 12-14 Uttapams/Pancakes.

Tuesday, November 8, 2011

Paneer and Mixed Vegetables Pulao - Cottage Cheese and Mixed Vegetables Pilaf


Paneer & Mixed Vegetables Pulao


Paneer & Mixed Vegetables Pulao

This is another quick and easy one pot meal. This recipe does not use onion and garlic. It really comes handy on certain auspicious days according to the Hindu calendar when we are required to cook without onion/garlic. Also many people are allergic to onion/garlic, so this recipe is for them as well. I know this first hand as my FIL(father-in-law) is allergic to garlic and when they were visiting us I cooked many dishes without garlic and many of them without onion as well.  I was really surprised at the results. Also, since I just love fresh herbs I try to incorporate a lot of that in my cooking as well. I happened to have fresh mint and had to use this in this recipe. I hope you like my minty flavoured Pulao.  

Ingredients:
  • 2 cups basmati rice
  • 1 cup paneer diced
  • 1 cup mixed vegetables (peas,carrots, green pepper,red pepper)
  • 2 tbsp freshly grated ginger
  • 2-3 green chillies slit
  • a few fresh mint leaves
  • 1 tomato chopped
  • 2 tsp cumin seeds
  • 2 bay leaves
  • cinnamon stick
  • 1 black cardamom
  • 1 tsp turmeric powder
  • 1 tsp red chilli powder
  • 1 tsp cumin-cilantro powder
  • 4 tbsp olive oil
  • salt to taste
Preparation : Wash and Soak 2 cups of rice in 4 cups of water. Keep this aside for around 15-20 minutes.Heat some oil in a pan. Add cumin seeds, bay leaves, black cardamom and cinnamon stick. Add the grated ginger. Fry for a minute. Next add green chillies , chopped tomatoes and mint leaves . Fry for about 2 minutes on medium flame. Add  the diced Paneer and mixed vegetables. Stir fry for about another couple minutes.Then add turmeric powder, salt, red chilli powder and cumin-coriander powder. Add rice with the water which we had kept aside earlier. Let this cook uncovered on medium flame. Now when you see that most of the water has dried up (like 85-90%) set the stove to the lowest flame and cover the pan with a lid and cook for about 5 minutes.

Paneer & Mixed Vegetables Pulao is ready to serve. Serve with Raita of your choice.This recipe serves 4. Enjoy. Bon appetit !!!


Paneer & Mixed Vegetables Pulao

Saturday, October 15, 2011

Palak Paneer - Spinach and Cottage Cheese


I'm back. I've been back for a while from my vacation. I always find it hard to get back to blogging if I take a break.  I guess its a case of the Blogger's Block. I did have a very relaxing and good time in India though. Got to meet  up with family and my kids had a wonderful time as well.

Today's recipe is one of my favourites. Its an easy and classic North Indian recipe. 

Ingredients :
  •  2 large bunches of Spinach (Palak) - washed and chopped
  •  250 gms Paneer (cottage Cheese) - cubed
  •  1 onion finely chopped
  •  4 cloves of garlic minced
  •  1 tomato chopped
  •  2 green chillies chopped
  •   1/2 tsp turmeric powder
  •  1/2 tsp red chili powder
  •  1 tsp cumin - coriander powder
  •  salt to taste
  •  oil

Preparation :  Blanch the chopped Spinach for about 3 minutes. Let it cool and then grind it  until you get a course texture. Heat oil in pan. Add the chopped onion. Fry till golden brown. Add the minced garlic. Fry for about a minute. Add chopped tomatoes and green chillies. Fry for about 2 minutes and add the dry spices - turmeric powder, red chili powder, cumin-cilantro powder. Let it cook for about 3-4 minutes until its all well combined. Add the Spinach paste and mix well. Add the cubed Paneer. Add Salt and mix well. Add little water if required. Cover and let it cook for about 5 minutes. Palak Paneer is ready to serve with any Indian bread. I even love it with Jeera Rice- Cumin Rice. This recipe serves 4. Enjoy.


Friday, May 20, 2011

Hydrangeas Cupcakes- Vanilla Cupcakes


Its been a while that I posted a recipe here. Have been a lot busy as recently started a new job. It takes a little time to get into a routine especially if you've been a full time mom for the last three years. But I'm loving it. Its GOOD busy. My younger one gets to be at his school and daycare and interact with kids his age and I get some time away from the never ending household chores.

Last weekend we all went to the Nascar Event(car Racing) at Dover Delaware. Both my kids and my husband are great fans of Nascar. At my house you will hear nothing but Nascar conversations and friday nights and weekends they will religiously follow it on TV. Though each of them follow a different driver. That day none of their drivers won, but it was an interesting race and we all had a good time.

Also I happened to bake these vanilla cupackes over the weekend and I wanted to try my hand at decorating them with hydrangeas. These are my favorite flowers. They are just so beautiful and love their colors. I particularly love the bluish purple hydrangeas. Though I could'nt quite get that color for the icing.


  Ingredients :
  • 1 1/2 cups all purpose flour
  • 1/2 cup unsalted butter
  • 3 eggs   
  • 2/3 cup granulated white sugar
  • 1 1/2 tsp baking powder
  • 1/4 tsp salt 
  • 1 tsp Vanilla extract
  • 1/4 cup orange juice 
Preparation :
  • Preheat oven to 350 degrees F (177 degress C) and line muffin cups with paper liners. I have used mini muffin cups which will yield 24 mini cupcakes.
  • In a bowl sieve together all purpose flour, baking powder and salt. Keep it aside.
  • Beat butter and sugar using an electric mixer or a hand mixer until light and fluffy.  Add eggs one at a time and beat well. Add the Vanilla extract and mix it well.
  • Now add the flour mixture and orange juice alternately in about three additions and mix it well.
  • Fill the muffin cups with the batter and bake for about 17-20 minutes until a toothpick inserted into a cupcake comes out clean. 
  • Allow to cool for about an hour and then decorate them with buttercream icing. I have used wilton tip #2D for my hydrangeas.

Recipe adapted from The joy of Baking.

Saturday, May 7, 2011

2nd Blog Anniversary and Happy Mother's Day...

Wishing all mothers a very happy Mother's Day. Also I'm so happy that Curry and Beyond is celebrating its 2nd anniversary.


It has been a beautiful journey and I have made such wonderful friends and learnt so much. Thanks to you , all my awesome readers for your support and encouragement. Curry and beyond wouldn't be here without YOU !!!.


Sunday, May 1, 2011

Princess Cake


 Vanilla cake with Buttercream icing.  


Begin by baking two 9" cakes and one dome shaped cake. They are cooled for an hour and then the center of each cake is cut out. This will make it easy to insert the Barbie doll and  the cakes will form the Barbie's elegant dress. Then apply the pink icing in between the layers and then around it. Let it be in the refrigerator for about an hour before you can pipe the icing and make the dress. A real barbie doll is then wrapped with plastic and inserted in the center of the cakes. Soon you are ready to dress up your Princess doll. You can use your imagination and and make the dress of your choice using different decorative icing tips.

Voila , your Princess Cake is ready to Party !!!


This Princess cake was baked for a friend's daughter's 5th Birthday. I'm gald I could help. It was worth the time and effort when I saw the look on her face and the joy it brought her...That was priceless!!! Also all the kids at her birthday party(including my 2 boys) were happy and excited and could'nt wait to have a slice of this cake. Must say so I was a little emotional when it was the cake cutting time..LOL.Well got a bit attached to my Princess as this was my first attempt at making this cake.


Saved a slice of this cake for You, You and You..All of my readers !!!. Enjoy.

Monday, April 18, 2011

Palak Pakodas- Spinach Fritters

Palak Pakodas are an excellent choice for appetizers or hors d'oeuvres. If you are planning to have a dinner party for family and friends, these pakodas will be a favorite with your guests. Also if you are in a mood for a quick and easy snack with your tea , this is a great option. Especially on dull rainy days, hot Palak Pakodas / Spinach fritters with your hot ginger tea is sure to put you in a wonderful and cheerful mood. 


Ingredients:


1 bunch Palak/Spinach finely chopped
1 1/2 cup besan / gram flour
2-3 green chillies finely chopped
1/2 tsp turmeric powder
1 tsp red chili powder
1/2 tsp amchur powder/dry mango powder
salt to taste
water
Oil for deep frying
    Preparation :
    • In a bowl , mix together all the ingredients listed above except Spinach and oil . Add water as needed so as to make a thick batter. Make sure that there are no lumps. Now add the chopped Spinach/Palak and mix it well.* 
    • Heat oil in a thick bottomed pan for deep frying the pakodas. 
    • Scoop the pakodas batter with your hand and gently drop them into the oil or use a spoonful of batter and gently drop them in the oil. Fry on medium heat till golden brown in color. 
    • Palak Pakodas / Spinach fritters are ready to be served with green chutney or Ketchup and a hot cup of ginger tea. This recipe yields about 20-22 Pakodas / fritters and serves 4. 
    * If you find the batter is not thick enough to make pakodas, add a little besan/gram flour.

    Saturday, April 16, 2011

    Puran Poli - Indian Flatbread with a stuffing of lentil cooked with Jaggery.

    I love Puran Poli and made these for Gudi Padwa. These are made for special days and mostly for festivals. Gudi Padwa is the festival of Maharashtra which is celebrated to ring in the Hindu new year.


    Now in Karnataka and Andhra Pradesh this festival is called Ugadi. In Tamil Nadu, it is Puthandu and Baisakhi in Punjab. The Sindhis call it Cheti Chand and the Manipuris call it Sajibu Cheiraoba.

    Also Puran Poli or Puranachi Poli is made in other states of India too and known as Holige, Obattu, Bobbatlu, Bhakshalu and Poli. Whatever name you call it , it is just divine...


    I followed the recipe from one of my dear blogger friend Pavithra. Her blog Dishes from my Kitchen has such amazing recipes with detailed step by step instructions. Her presentation and clicks are mesmerising and professional. It was a pleasure to use her recipe and I was happy as I made the Puran Poli for the very first time and everybody at home loved it. Click here to check out her blog and check the original recipe for Obattu/Puran Poli.

    Ingredients :

    For the Poli -Flatbread 
    1/2 cup All Purpose Flour
    1 cup Wheat Flour
    1/4 tsp salt
    3 tbsp warm oil
    Water as needed

    For the Puran - Stuffing
    1 1/2 cups Chana dal /Bengal Gram Dal
    1/2 tsp turmeric
    salt to taste
    2 cups Jaggery
    10 Cardamoms (powdered)
    1 tbsp Ghee
    Ghee for roasting
    Some wheat flour dusting

    Preparation :

    Prepare the dough for the Poli /Flatbread. Mix together all the ingredients in a mixing bowl listed under the ingredients for the Poli except water. Add water little at a time. Knead the dough well. Add some oil , cover and keep aside for about 5 hours.


    Prepare the Lentil Stuffing. Wash and soak Chana Dal for about 1/2 hour. Then cook it in a pressure cook with 1 cup water , turmeric and salt. Cook until fully cooked for about 3 whistles.
    Now take the cooled dal and drain if you have any water and mash it to a fine paste using a food processor.


    Heat ghee in a thick bottom pan or Kadhai. Add the mashed Chana dal and the jaggery. The jaggery will melt and keep cooking on medium flame till the mixture thickens. *

    Get if off the flame and add the powdered cardamoms and keep aside. The mixture will further thicken and dry out once it cools down. Now divide the dough into 10 -12 equal sized balls and likewise divide the cooled stuffing mixture into 10-12 equal sized balls.

    Now its like making any stuffed paratha- You roll the dough ball into a small circle using a little flour for dusting. Now place the stuffing onto the circle. Close it and press gently so as to be able to roll it into a paratha/roti. Roll it gently using a little flour.


     Now fry this Puran Poli on a heated griddle/Tawa using some ghee. Cook on both sides.
    Your Puran Poli are ready to be served. Serve warm with some ghee and a glass of milk. Its simply divine...
    I have used a different method for step#4. I added the jaggery with the chana dal paste and cooked  them together. Pavithra melted the jaggery first and strained it. Then she used this with the dal paste and cooked them together.

    Thursday, April 14, 2011

    Celebrate Baisakhi - Tamil New Year- Vishu with Semiya Payasam - Seviyan Kheer


    Wishing you all
    Happy Baisakhi ,
    Happy Vishu and
    Happy Tamil New Year.


    Click on the above link for the recipe. We all absolutely love Semiya Payasam - Seviyan Kheer at my house. It tastes divine and absolutely easy to make. May the  new year be filled with sweetness like this payasam and be prosperous to  you all... Lets all enjoy the harvest festival and be thankful for the bounties of nature.

    Wednesday, April 13, 2011

    Recipe Index


    Breakfast
    Wheat Blueberry Pancakes

    Beverages


    Soups
    Broccoli Ka Shorba- Cream of Broccoli
    Carrot and Peas Oatmeal Soup
    Beetroot Soup
    Irish Potato Soup


    Appetizers - Hors d'oeuvres
    Hara Bhara Kebab
    Baked Potato Wedges
    Escarole Pakoras-Escarole Fritters


    Spinach and Cranberry Dal


    Rice- Pilaf and more...
    Cranberry Ginger Pilaf
    Tricolor Pilaf
    Paneer Cilantro Pilaf
    Pineapple Stir-fried Rice


    Pasta and Noodles
    Easy Cheesy Vegetable Farfalle
    Rotini Pasta with Basil and Margherita Sauce
    Vegetable Hakka Noodles


    Tuesday, April 12, 2011

    Broccoli and Paneer Stir Fry.

    Broccoli and Paneer Stir Fry
    This is another quick and easy recipe. I have used Paneer in this recipe but could be substituted with Tofu as well. This recipe has been in my folder for so long and decided its high time it sees the light of the  blogosphere. This recipe was created just on the spur of the moment when one afternoon I really did not have much time to prepare lunch and wanted something which was quick and delicious.When I made this dish I must say I was pleasantly surprised and loved it and so did my 3 1/2  year old. It goes well with just plain rice.

    Ingredients:
    • 1 lb broccoli cut into florets
    • 1/2 lb Paneer(Indian Cottage cheese) cubed
    • 1 small  red bell pepper/capsicum cubed
    • 2-3 cloves of garlic minced
    • 1 bunch spring onions (6-8) chopped *
    • 2-3 green chillies slit
    • 1 tbsp soy sauce
    • 1/2 tbsp red chilli sauce
    • 1/2 tbsp vinegar
    • 1 tbsp cornstarch/cornflour dissolved in 1/4 cup water
    • salt to taste
    • 2 tbsp oil
    * Keep the greens and the whites of the spring onions separate. The whites are used in the beginning of the preparation and the greens are reserved for garnishing this dish.

    Preparation:
    1. Heat oil in a thick bottomed pan or Kadhai. Add minced garlic and the whites of the spring onions. Add  paneer and stir fry on high flame for about 2 minutes.
    2. Add the broccoli florets, red bell pepper , green chillies and stir fry on high for another 2 minutes.
    3. Next add the soy sauce, vinegar, red chilli sauce and stir it well.
    4. Add the cornstarch mixture and stir for about a minute. Adjust the salt. Remove from the fire.
    5. Garnish with the greens of the spring onions kept aside.
    6. Serve your Broccolli and Paneer Stir fry with white rice. 
    7. This recipe serves 4. 

    Monday, March 21, 2011

    Brussels Sprouts Parathas- Brussels Sprouts Flatbread

    If you know me enough you will know by now that I love to try all my vegetables and especially the ones which are not really loved at my house and make parathas/flatbread. I know its disguising the veggies and one can't really tell many a times what vegetables have been incorporated in the parathas. But many a times thats the whole plan. So before my DH and kids can say no to that vegetable , it happily is converted into a paratha. The things we do for love to keep our family healthy. Alright Brussels Sprouts(look like miniature cabbages) do happen to fall in that category, my kids don't really care for it much. Since it have so many health benefits ( rich in Vitamin A, Vitamin C, folic acid, fibre), I was very keen to make parathas with them and everybody loved it. 

    So for those who have not tried Brussels Sprouts yet, this recipe is a must try. For those who tried and did not quite like the taste..try these yummy parathas and you'll be converted for sure into a hardcore Brussels Sprouts fan!!!.

    Ingredients :
    • 10-12 brussels Sprouts finely chopped *
    • 3 cups wheat flour
    • 2 green chillies finely chopped
    • 1" piece ginger grated
    • 2 tbsp fresh cilantro leaves chopped
    • 1 tsp turmeric powder
    • 1/2 tsp red chili powder
    • 1/2 tsp cumin powder 
    • 1/2 tsp amchur powder/dry mango powder (optional) 
    • salt to taste
    • 1 tbsp oil
    • water as required
    * almost a pound of Brussels Sprouts.

    Preparation :
    • Mix all the above mentioned ingredients together and knead it into a dough. Use as much water as required so as to make a  paratha dough.
    • Now divide the dough into 18-20 equal parts/balls which will yield about 18-20 parathas.
    • Using some wheat flour roll each ball into a paratha(disc shape).
    • Cook the paratha on a hot griddle or Tava using oil. Cook on both sides.
    • Your Brussels Sprouts Parathas is ready to be served. Serve them with pickle, Raita or just plain yoghurt. 
    More Brussels Sprouts recipe- You could try my Brussels Sprouts in tomato gravy.

    Friday, February 25, 2011

    Pineapple Halwa - Pineapple Pudding

    I had heard about Pineapple Halwa but never attempted to make this at home and also had never tasted one. Gajar ka halwa/ Carrot Halwa being my favorite. But always had a desire to try making pineapple halwa. This opportunity came quickly as about half a pineapple made its presence felt everytime I opened my refrigerator. We had used half of it for making Raita and used it also in the black bean salad. But we still had some left. So I set out to make this halwa for the very 1st time and I was happy. Its delicious and just melts into your mouth. I'm sure this halwa is going to be a regular at our house.


    Ingredients :
    • 3 cups Pineapple finely chopped/grated
    • 1/4 cup clarified butter/ghee
    • 3/4 cup sugar *
    • 1/2 cup whole milk
    • 1/2 cup Milk / Mava powder 
    • 1/3 cup cashews and slivered pistachios
    * You could adjust the amount of sugar in this recipe depending on the sweetness of the pineapple. I used 1/2 cup sugar first and then found out it needed 1/4 cup more.

    Preparation :
    1. Heat ghee in a thick bottomed pan / kadai. Fry the cashews and pistachios. Keep them aside. In the same pan add the grated pineapple along with its juice. Fry for about 4-5 minutes on medium heat.
    2. Now add 1/2 cup whole milk and mix it well. Cover and let it cook on low-medium heat until all the milk is absorbed. This takes about 10-15 minutes. 
    3. Add sugar and  mix it well. Add the milk / mava powder and stir well making sure it does not stick to the bottom of the pan. Add the fried nuts. Let  it cook on slow flame until the halwa/pudding starts to leave the side of the pan.Turn off the flame.
    4. Your Pineapple Halwa is ready to be served. Its best enjoyed warm or at  room temperature.
    5. This recipe serves 4.     
    

    Thursday, February 24, 2011

    Quinoa and Vegetable Stir Fry.


    For many of us who have not heard or know little about  Quinoa pronounced as "Keen-wah" , this post is for you. It was only recently that I heard about this super grain and set out to find more about it. It was hard to find this in the local grocery stores. Once on a visit to my nearby Trader Joe's I found Quinoa and I'm highly impressed with the results. This is my first recipe with Quinoa and I'm sure I'm going to use it more often after reading about the tons of health benefits it provides.

    Alright lets get introduced to the key player in this dish, shall we...Quinoa

    Now Quinoa is most commonly considered a grain but in reality it is a seed. It is a species of goosefoot which is a grain-like crop which is grown for its edible seeds. They are no ordinary seeds as it is high in amino acids. In simpler terms high in protein and that too a complete protein, which means it has all the 9 essential amino acids. With me so far..or did I confuse you.


     Alright apart from being a Protein Powerhouse,  its ideal for people with celiac disease (as its gluten-free), great for vegans and people who are lactose intolerant as it provides Calcium as well.

    It is a recently rediscoved ancient "grain". It was native to South America and once considered "The Gold Of The Incas" as the Incas discovered the intake of Quinoa seeds increased the stamina of their warriors.


    Some of the other health benefits are:
    • Lowers the Risk of Type 2 Diabetes.
    • Provides cardiovascular health - for those concerned about atheroscherosis.
    • Helps prevent Migraine headaches.
    • Prevents heart failure.
    • Provides Cardiovascular benefits for postmenopausal women.
    • Protection against breast cancer.
    • Prevention of gallstones.
    For more details about the health benefits Click here.

    Cooked Quinoa has a fluffy, creamy , a bit crunchy texture with a nutty flavor. It is very versatile and can be easily adapted to savoury or sweet recipes and even to salads or soups.

    Ingredients:
    • 1 cup Quinoa
    • 1 cup shredded green cabbage
    • 1 carrot cut
    • 1 orange bell pepper cut ito strips
    • 1 green bell pepper cut into strips
    • 2-3 cloves garlic minced
    • 1 bunch green scallions chopped
    • 1 tbsp Ching's soy sauce
    • 1 tbsp Ching's  red chilli sauce
    • 1 tsp Ching's green chilli sauce
    • 1 tbsp vinegar
    • 1 tbsp oil
    • salt to taste

    Preparation :
    1. Quinoa can be cooked the same way as you would cook regular rice. The only thing to remember is to wash it thoroughly under running water in a fine sieve or a cheese cloth. Quinoa in its natural state does have a bitter coating called saponins ..some of it is removed while packaging some may not be. So always a good idea to wash it well.
    2. Now cook the washed Quinoa by adding 2 cups of water in a pot.Add some salt to taste.Bring it to a boil and cover and let simmer for about 15-18 minutes until the water is all absorbed and the Quinoa is cooked. Keep this aside.


    3.  In a skillet, heat some oil. Add the minced garlic. Saute for a minute. Add the white portions of the scallions. Add all the chopped vegetables. Mix well. Add soy sauce, red chili sauce, green chili sauce, vinegar. Mix well.  Let it cook on high heat for 2-3 minutes.  Adjust the salt.


    3. Next add the cooked Quinoa. Mix it well. Cook for 3-4 minutes on high heat till its well incorporated with all the veggies and the sauce. Turn off the heat. Garnish with the greens of the scallions and serve.


    4. This recipe serves 2-3. This is a complete meal by itself. Its healthy and packed with nutrients which makes it a guilt free indulgence. Enjoy and stay healthy. 

    Thursday, February 17, 2011

    Mini Chocolate Chip Cupcakes


    These cupcakes were made for my younger son's Valentine's day party at his preschool. I really enjoyed making them and my son was very happy too. He loves nature and when I said how about I decorate them with roses he was excited. I'm a bit late with this post but I wanted to share the process of making decorative roses for your cupcakes. I hope this post helps. Maybe you could make them for your next years Valentine's day or maybe just for yourself whenever you are in a mood for them..After all who can say no to such delectable delights !!!

    Ingredients:
    For the cupcakes- This recipe makes 24 mini cupcakes.
    • 1 + 1/2 cups all purpose flour
    • 2 tbsp unsweetened cocoa powder
    • 2 tsp baking powder
    • 1/4 tsp salt
    • 2 tsp vanilla essence
    • 1/2 cup vegetable oil
    • 1/2 cup milk
    • 1 cup sugar
    • 1/4 cup chocolate chips
    • 2 eggs
    For the decorated roses
    • 16 oz box of Betty Crocker's Rich and Creamy white frosting
    • Wilton's tip #2D
    • food colors of your choice
    • Disposable pastry bag(s)

    Preparation :
    For the Mini Cupcakes
    1. Preheat oven to 350 degree F (180 degree C). Line the muffin/cupcake pan with the cupcake liners. 
    2. Sieve together all purpose flour, cocoa powder, baking powder and salt and keep aside in a bowl. 
    3. Add sugar and vanilla essence and mix well. 
    4. Add milk, vegetable oil , beaten eggs and chocolate chips. Mix until all ingredients are blended. 
    5. Pour into the prepared cupcake pan and bake in the preheated oven for about 12-14 minutes until a wooden pick inserted in the center comes out clean 
    6. Allow the cupcakes to cool completely before decorating them to your liking.
    For the decorated Roses
    1. Tint the frosting with the food color of your choice. I have used Wilton's pink and yellow colors. I have decorated half the cupcakes with the yellow roses and half with pink. So I tinted half the frosting with yellow and the rest with the pink color.
    2. First you begin by cutting off the tip of the pastry bag.( You will need to cut depending upon the decorating tip you are going to use). Then Insert the tip#2D  into the pastry bag. Fill it with the frosting using a spatula upto about 3/4th of the bag and leave some room so as to be able to twist the bag and secure it.
    3. Now hold the pastry bag between your fingers and thumb. Applying pressure squeeze the frosting and start making the roses by starting at the center of the cupcake and going around it. It might need a little practice before you make them onto the cupcakes. But I found this is the easiest way to make roses and the cupcakes look so beautiful.

    Friday, February 11, 2011

    Chocolate Dipped strawberries

    In case many of you are looking for ideas for a perfect Valentine's Day treat or gift look no further. Presenting you the classic Chocolate Dipped Strawberries. They are easy to make look amazing and taste heavenly. What more can one ask for.. Wishing everyone a Happy Valentine's Day.

    Also Valentine's Day is a little extra special day for me as, this was the day I was married so it  marks our wedding anniversary too.  We'll be celebrating our 11th anniversary.  "S" is a remarkable , loving and kind person and friend and I really can't believe its been 11 years. It still feels like yesterday. Ours was a love marriage and I was and still am a die-hard romantic thats why I wanted to get married on Valentine's day.  I'm happy our love story had a happy ending. 
    
    Ingredients:
    • 18 fresh Strawberries
    • 1 1/2 cups chocolate chips 
    • baking sheet lined with wax paper
    I have used Nestle's toll house milk chocolate morsels/chips

    Preparation :

    Wash the strawberries and pat them dry. Keep the stems intact.

    
    Melt the chocolate chips in a double boiler (one heat proof  bowl contained the chocolate chips and it was placed on top of another pot with simmering hot water). Whisk gently till the chips are all melted. Turn off the heat. Now Dip each strawberry into this melted chocolate by holding onto the stem. Swirl the strawberry and let the excess chocolate drip back into the bowl. Place the Strawberry gently onto the baking sheet lined with wax paper. Repeat the same procedure with the rest of the strawberries. 


    Chill the strawberries in a refrigerator for about 30 minutes. You can see the chocolate coating has set well. Enjoy your Chocolate dipped strawberries and share them with your loved ones.